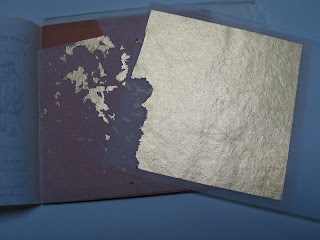
I tried two experiments, one using BS Glaire (the type of shellac-based size used for gilding on leather with hot tools) and the other with the reversible PVA. The BS Glaire didn't work, it soaked into the paper too much, and the gold would not adhere to it when dry. The PVA worked, and here I used two applications, but the surface is not very smooth. Flat gilding and raised gilding are different as the raised kind has a cushiony domed profile and can be made very smooth, so it can be burnished to a high gleam. The flat type has definite possibilities, and I will try some different effects, going with the medium rather than trying to emulate raised gesso gilding. In the following photo I tried flexing the page and creasing across the gilded area, and it stayed put, so I guess it's safe to use for this application.
The gold leaf can be burnished when dry. I used a haematite burnisher, which is shaped rather like a lipstick, with a flat face. For flat gilding this is easier to use than the dog-tooth shaped burnishers you can buy as it doesn't dig in. You could probably use the back of a teaspoon instead, if you don't have a burnisher. The type of gold I use is 23 ct and there are two main types, loose leaf gold and transfer gold. I think both types can be bought in single or double, the double thickness obviously being thicker than the single. For these experiments I used single transfer gold leaf. It is lightly adhered to a thin tissue backing sheet, which makes it easier to handle, you can cut it into pieces with scissors if you want to. Next time I'll try the double loose leaf, and maybe it will be good with one application, perhaps the result will look better. The gilding tools and materials, along with the gold leaf I bought about twenty five years ago so are probably more expensive now. Here is a very good and informative site to learn more about gilding
 Above, front cover of gold book, open on right showing sheets of partly used transfer gold. On the right is the haematite burnisher, with its flat smooth face. You have to be careful not to touch this with your fingers as the oils from your skin will prevent it from burnishing properly. I keep it in a bubble wrap sleeve. Some time ago I bought a 'job lot' of burnishers which had obviously had a long and productive life, I show them also. I think they were used for gilding picture frames as the shapes would be good for picture frame mouldings. I don't seem to have the magic touch with pictures as they go where they want, not where I put them.
Further to the question of gold size, I ordered some from the supplier above but forgot that acrylic polymers are sensitive to freezing. It finally arrived in the first week of January and had been frozen en route, so was completely polymerized into a block reminiscent of a latex sponge. I have decided to wait until the weather is warmer before re-ordering and will report at a later date on this.


2 comments:
The touch of gold gives it another dimension; lovely! I was really interested in your description of the experiments as well.Aren't those old gilding tools lovely....I love things like that.
Thanks, Sue. I tried a different effect yesterday with the loose gold leaf, which I will post later, when I've taken photos of the extra tools I used. I will probably never use all those burnishers, but I do love them, and that they have been so well used.
Post a Comment