Sunday, February 28, 2010

The Real Leonardo Da Vinci

Leonardo Dreams of His Flying Machine          For newcomers to this blog, or those who have forgotten what it's about, here's a link to "Leonardo Dreams of His Flying Machine" on Vimeo, performed by the Brigham Young Singers  and made to advertise their concert last year. I love their enthusiasm.  There are lots of other versions on Youtube, the BYU singers is my favourite. 
          Looking through the facsimile pages of Leonardo's notebooks for his early studies of wings, I came across a page fragment with four separate sketches of different types of winged creatures, none of them birds. I reproduce it here, you can see a dragonfly, insect (? moth or fly), flying fish and a bat. 
The pen-strokes are rapid but controlled and sometimes don't quite join up, and he doesn't bother to complete the opposite wings of the fish and the bat, they are taken as read, being the mirror images of the first side. They are notes on his observations, aides memoirs. The dragonfly's legs are haphazardly drawn, but they are of no concern to Leonardo, it is the wings that interest him. 
      I find the sketch of the bat particularly fascinating as to me it reveals Leonardo the man, enjoying his own joke, his old retainer holding out the wing of this enormous bat, the wing being almost the size of his retainer's cloak, the body of the bat being the size of a large lamb. 
      The retainer's expression is one of comical earnestness, he's holding the bat's voluminous wing and the quality of the drawing is such that one can almost feel his grip on it. The hooded cloak is drawn in some detail, almost as though Leonardo couldn't help reproducing the folds of this garment. I love this drawing for its immediacy, skilful execution and its humour, it brings the genius that was Leonardo Da Vinci to life.
      I will use some of his early sketches for the preliminary pages of the book, to lead the reader in to the text of Tony Silvestri's poem. To help set the mood, I decided to colour the paper (Griffen Mill's handmade-see earlier posts) to emulate the pages of the notebook. I stained down a couple of trial pieces, using tea. I made it fairly weak, and applied with a large soft brush to damp paper which was taped to a formica-faced board with masking tape to keep it flat. It took three applications and dryings to get the colour and I made it a little uneven. Of course, it stretches and bubbles up when wet, but dries back flat. You can use a hair-dryer to hasten the drying process. I was quite pleased with the result and will try printing on it when I next have the press inked up. 

Friday, February 12, 2010

The bling goes on

          Detailed below is a further trial using loose gold leaf, and the same reversible PVA. Loose gold has to be handled a little differently from the transfer gold because the slightest air current can disturb it before it has been laid, and waft it into a mangled heap. I show in the photos the tools I use, a gold knife (which is not particularly sharp on purpose), which has quite a broad blade and I sometimes use this to manoeuvre the leaf, along with the gilder's tip. That is the wide brush made (I think) from badger hair that you use to lift the leaf and position on the page. You could also use a piece of stiff paper. 


          The gilder's cushion is one I made way back, and I think I made it from a piece of binder's board and a piece of batting cut to the same size and covered with an oddment of suede leather. You hold the gold book in your left hand, bending back the front cover, and lift out the leaf with your right, and lay it on the cushion, ready to cut into suitably sized pieces. If it folds over on itself, you can often just lift it with the blade and flop it back down gently.
          One of the problems with using a coloured paper is that you can't see where you have painted the PVA, so next time I will add more red watercolour to the mix. They used to use armenian bole, a rust coloured earth pigment, to colour the gesso, but watercolour does just as well, and probably mixes better when you're using PVA.
      
  Briefly, the steps are as follows: paint the PVA where you want the gold to stick. Let it dry. Cut the gold so you have a piece the size of the area to cover. Breathe on the PVA and immediately lift and place the gold in position. Using a piece of thin silicon paper or tracing paper, place this on top of the gold and press onto the PVA with your fingers firmly. Rub gently through the paper, then use a burnisher rubbing gently at first then applying more pressure. Remove the paper and check if it has adhered by gently brushing with a small soft paintbrush. When you are sure it is completely dry you can re-burnish to a high shine. If it is patchy you can try the 'breathing, applying gold' steps again as gold will usually stick to gold. You can also re-size if it still won't stick, but be careful not to apply too much. The moisture from your breath re-activates the PVA. The gold which has not stuck to the PVA will fall away as you brush (I call these 'gold crumbs'). You will be left with a gilt letter or shape. 
        
  I save the gold crumbs for use as 'shell gold', the old name for gold paint made from real gold dust. Do your brushing over a piece of paper which has one edge folded up about two inches, then you can shake the crumbs down to the fold and into a small container. See photo of little jar. Then can be pulverized to a powder and mixed with gelatine. (I use the medical gelatine capsules bought from a pharmacy - heat gently to melt, then mix.) This makes real gold paint, which can be reactivated with water and keeps for a long time. It can also be burnshed when dry but it is never quite the same as the sheer bright look of gold leaf. 
         
Here is the result of the second experiment. The actual size of this print is 55 mm x 70 mm or about 
2 1/8" x 2 3/4" .


Wednesday, February 10, 2010

Bring on the Bling

          I've always loved the gleam of gold on a page. A gilded initial or a highlight of some kind brings the page to life, the reflection of light gives it a new dimension. Years ago I learned raised gilding using gesso, a mix of plaster of Paris (calcium carbonate) and various adhesives according to recipe. But to use gesso, the substrate you are working on needs to be fairly rigid otherwise the gesso can crack or split off the page. Usually raised gilding is done on vellum or a heavier paper. The weight of paper I'm using for the illustrations for this miniature book is not really rigid enough, so my thoughts turned to flat gilding with PVA. One of my calligraphy tutors from the 1980s, the kindly and talented John Shyvers, wrote an article called 'Gilding with PVA' detailing his experiments with this material, which I have since mislaid. PVA is made to many different specifications depending on the qualities required of it. The type I sometimes use is known as Reversible PVA because it can be soaked back and softened with water if need be, which is not the case with all PVA adhesives. It is a white glue that dries clear. John's article originally appeared with the typo 'Gliding with PVA' which gave us a chuckle at the time, and would probably have sent Leonardo into a flat spin.
 I tried two experiments, one using BS Glaire (the type of shellac-based size used for gilding on leather with hot tools) and the other with the reversible PVA. The BS Glaire didn't work, it soaked into the paper too much, and the gold would not adhere to it when dry. The PVA worked, and here I used two applications, but the surface is not very smooth. Flat gilding and raised gilding are different as the raised kind has a cushiony domed profile and can be made very smooth, so it can be burnished to a high gleam. The flat type has definite possibilities, and I will try some different effects, going with the medium rather than trying to emulate raised gesso gilding. In the following photo I tried flexing the page and creasing across the gilded area, and it stayed put, so I guess it's safe to use for this application.
The gold leaf can be burnished when dry. I used a haematite burnisher, which is shaped rather like a lipstick, with a flat face. For flat gilding this is easier to use than the dog-tooth shaped burnishers you can buy as it doesn't dig in. You could probably use the back of a teaspoon instead, if you don't have a burnisher. The type of gold I use is 23 ct and there are two main types, loose leaf gold and transfer gold. I think both types can be bought in single or double, the double thickness obviously being thicker than the single. For these experiments I used single transfer gold leaf. It is lightly adhered to a thin tissue backing sheet, which makes it easier to handle, you can cut it into pieces with scissors if you want to. Next time I'll try the double loose leaf, and maybe it will be good with one application, perhaps the result will look better. The gilding tools and materials, along with the gold leaf I bought about twenty five years ago so are probably more expensive now. Here is a very good and informative site to learn more about gilding


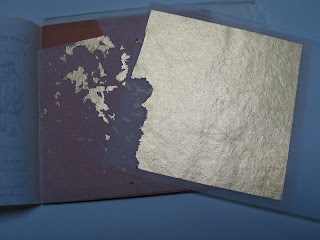
Above, front cover of gold book, open on right showing sheets of partly used transfer gold. On the right is the haematite burnisher, with its flat smooth face. You have to be careful not to touch this with your fingers as the oils from your skin will prevent it from burnishing properly. I keep it in a bubble wrap sleeve. Some time ago I bought a 'job lot' of burnishers which had obviously had a long and productive life, I show them also. I think they were used for gilding picture frames as the shapes would be good for picture frame mouldings. I don't seem to have the magic touch with pictures as they go where they want, not where I put them.
          Further to the question of gold size, I ordered some from the supplier above but forgot that acrylic polymers are sensitive to freezing. It finally arrived in the first week of January and had been frozen en route, so was completely polymerized into a block reminiscent of a latex sponge. I have decided to wait until the weather is warmer before re-ordering and will report at a later date on this.