Wednesday, October 14, 2009

Aero Linen

          Although we don't really know whether Leonardo actually tried out any of his flying machine ideas, he obviously thought about the practical details of constructing the wings. In his notebooks he says:
"I find that if this instrument made with a screw be well made that is to say, made of linen of which the pores are stopped up with starch..."
          These words reminded me of my brother's childhood models of aeroplanes made from balsa wood, covered with doped tissue paper (Biggles anyone?) and also of the aero linen I used to use for bookbinding. Aero linen was the fabric originally used to cover the 'skeleton' of early planes, and was also 'doped' or painted to 'stop up the pores' as Leonardo put it. I understand that the spars forming the skeleton of the plane were bound with strips of linen and the covering of the panels was then stitched to this, and then 'doped' with a solvent based type of varnish. When dry this gave a tough light-weight membrane. Linen is one of the strongest natural fabrics available, and is used in the conservation and repair of books. 
          After a bit of research I found a supplier of this linen fabric, and may well use it for part of the book, though at the moment I have no idea exactly how.


Aero linen
It is probably quite close to the sort of thing Leonardo was thinking of, a strong, finely woven unbleached linen cloth, to which the early aviators trusted their lives. Charles Anthony Silvestri says in his comments on Eric Whitacre's blog:
          "It ocurred to me that this was a poem, not historiography, and I was free to compose out of my imagination details of setting and character. It was OK to view this Leonardo as an amalgam of images from books, movies, daydreams-a fabricated, impressionistic Leonardo who exists in an imaginary place and time. This revelation was immensely freeing to me, and I have stayed connected to that freedom."
          Similarly, I am really interested in conveying the feelings and images of Leonardo's imaginary dream, I don't wish to reproduce authentic details of fifteenth century Italian life, except in so far as they may contribute to the general picture. Using the linen as a case in point, I would use it to reference the linen that Leonardo may have had in mind, not to reproduce or replicate his drawings in wing form. It would give an idea of just how flimsy the materials were, and how much trust and faith the first aviators had to have in order to put their lives at risk. No wonder Leonardo suggested trying his first flying machine out over water...
        And on a different note, I shall be showing some of my books at the  Alcuin Vancouver Wayzgoose - printing fair - which will take place on Saturday October 24 in the Vancouver Central Library on West Georgia. See their website for further details. There will also be a presentation by William Rueter on the previous evening in Labatt Hall, SFU on West Hastings, sponsored by the ever-generous Yosef Wosk. Both events are free. To my knowledge the Wayzgoose is the only event of this kind in Western Canada, and it takes place every two years, so be sure not to miss out if you are in the area. 


Tuesday, October 6, 2009

Baren Hand, Woodblock Elbow.

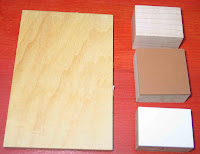
          Yikes! What have I been doing? The injuries mentioned above are not listed as such in any medical text book, but will no doubt ring a bell with anyone who has ever tried carving a wood or lino block and printing it. I've been experimenting over the past few weeks with various forms of relief printing, using (on left) shina plywood, cherry wood top right, middle right lino, Resingrave bottom right. Along the way I found some wonderful web resources, particularly Baren Forum with informative articles and helpful comments from artists of all kinds, and notably a very open willingness to share their knowledge and experience.


          However, nothing replaces the 'hands on' experience of actually cutting the block, inking it and printing. I've learned so much, spoiled lots of blocks and came to the conclusion that I need a parallel existence for this activity alone. Not having that option, the battle goes on. Some of the tools I bought are too big for miniature work, and I'm now waiting for two 1mm and 1.5mm u-shaped chisels to fly from Japan into my mailbox. Ditto some new blocks from McClains. Sometimes there are too many choices, too much information. I am gradually narrowing it down, but it takes a while to decide how you want your images to look, and how they will fit in with the text. One method that I may decide to use goes by the alarming nick-name of 'suicide block'.
          The reduction print process, aka 'suicide' method, is a process by which the block is first carved so that the first printing reveals the paper colour in the areas you carved away, then re-carved and inked and printed, this last stage being repeated as required, till at the end there is very little wood left. It's called a suicide block because you have to print at least as many prints as you need for the edition (allowing for 'duds') because once you have recarved the block there is no going back. Mistakes at any stage are not recoverable, you would have to start over and carve a new block. There are certain advantages to this method, it can save carving several blocks and can also help with registration. But it does need careful planning and is not suitable for every type of print. Some people use a combination of reduction and multiple blocks to extend the range of colours that can be used.
          I made a very simple print with one shina plywood block to try out this process, using Akua water-based colours, a brayer (ink roller), dry paper and a baren. A baren is a disc-shaped Japanese tool covered with a bamboo leaf wrapper. It is used in a circular motion for rubbing the back of the prints to transfer ink from block to paper. You can also use the back of a spoon, but the structure of the baren is designed to give an even pressure over the whole print, imparting a more uniform appearance. I hasten to stress that this print is not for use in the book, just a practice block to try out the method and materials. I didn't have a small plywood block so used a large one, with a 'ditch' cut around the size I needed. 
          Lots more carving practice is required and thought as to how to work out the colour schemes and printing sequences, as well as the actual images. Registration on these tiny blocks is a challenge. Shown below are the tools I used to carve the block, a knife, a u-shaped chisel and a v-shaped chisel. Also shown are the disc-shaped baren, and the home-made registration jig I use to make sure the block hits the paper in the same position each time. I learned a lot from my experiments. If I intend to use this method, I'll have to print lots of extras to allow for 'uglies' at each stage.


          Tools, blocks, inks and papers come mainly from McClains and Baren Mall (found on the BarenForum site). Both these suppliers are good to deal with in my experience.

          I haven't yet decided on the paper, as it will depend a bit on the images I come up with, and on whether I stay with water-based inks or go for oil-based. I've been trying various Japanese print-making papers, being lighter in weight that their western counterparts. Some papers and inks give a more solid area of colour, others have a more grainy texture. I'm waiting for some more paper samples from another supplier, Graphic Chemical, new to me. As my experiments progess, ideas change so nothing is set in stone at this stage. I may revert to just one or two colours, and I have yet to try printing on my press. I just like to try everything before I decide. (Hint: never go shopping with me.)
          Finally, I read an interview with the author David Mitchell, (Cloud Atlas, Black Swan Green), where he describes his creative process in this way: "My books coagulate, very slowly indeed, in a gloppy primordial idea-soup"...
While in no way equating my work with his, the creative process for me is equally slow and amorphous, and inches forward a little at a time. I'm hoping by the time my new chisels and blocks arrive that my arm and hand will have repaired, and in the meantime I'll be working on sketches for the images in the book.